
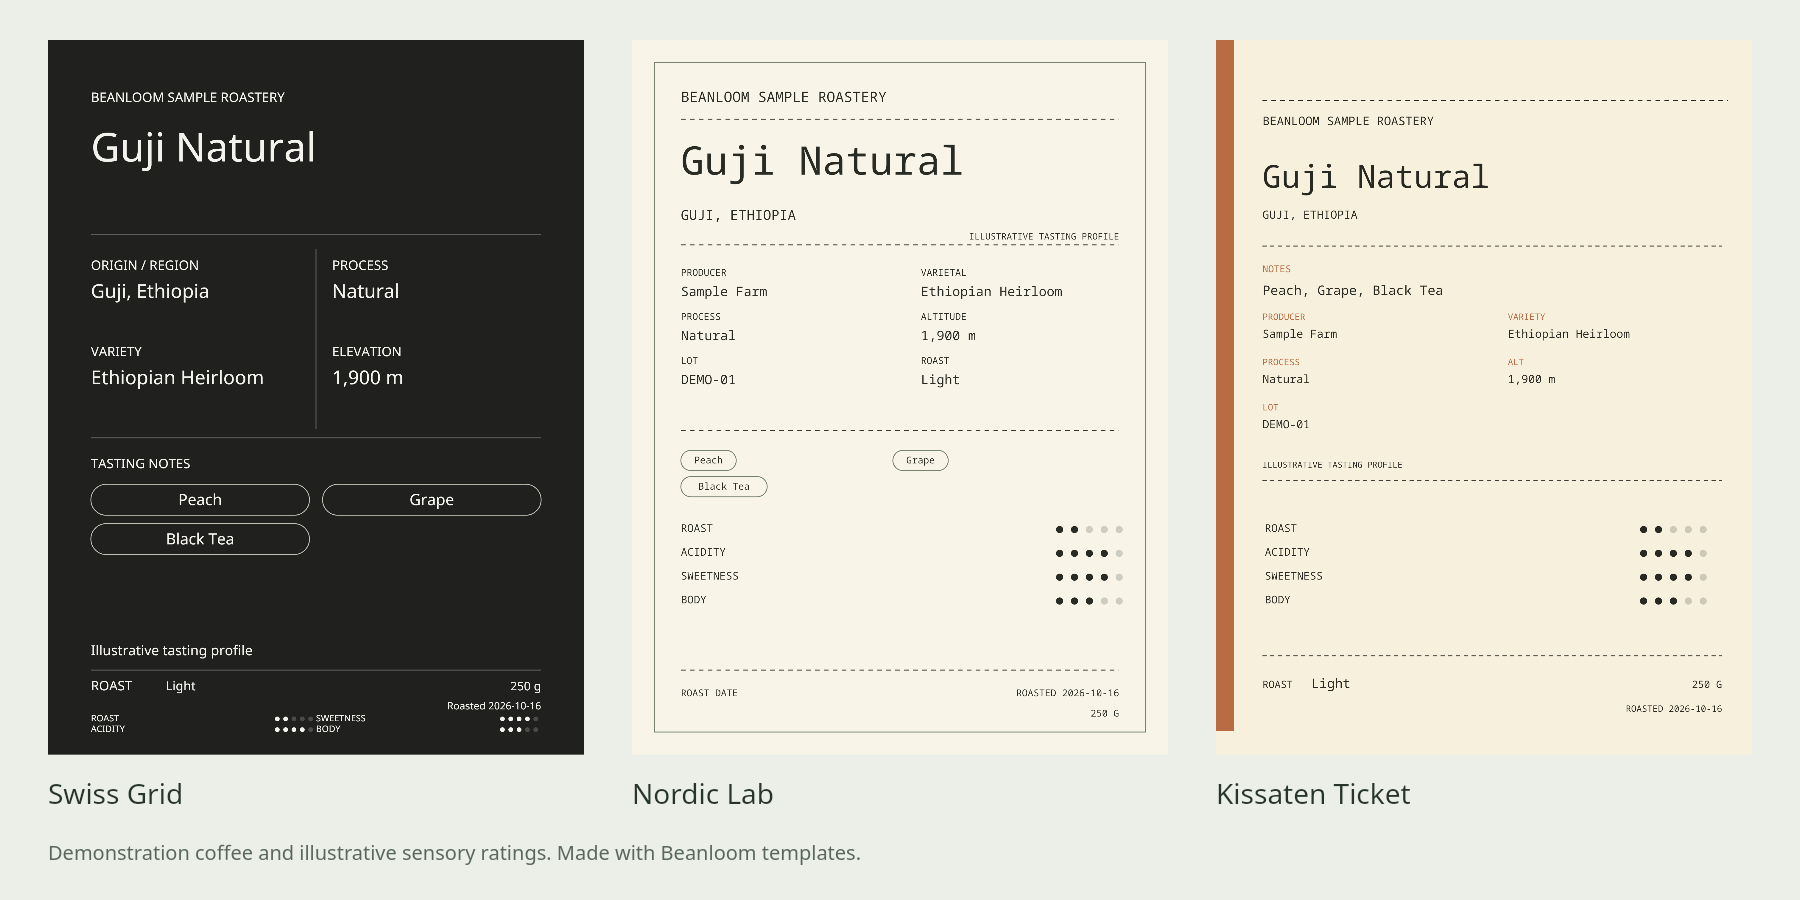
A coffee flavor profile card brings the coffee’s identity, origin and tasting notes into one compact design. To make a minimalist version, give the name one clear heading, group the origin facts, keep the flavor notes short and add sensory ratings only when you can explain them. You can start from an editable coffee label layout and use the finished image as a digital tasting reference or release graphic.
The three cards above were freshly exported with Beanloom’s template renderer. They use one fictional demonstration coffee and illustrative ratings, not a verified commercial lot or a first-hand tasting assessment. The individual PNGs below let you inspect the actual finished artwork.
Choose the information for your flavor card
Begin with the coffee name, country or region, processing method and a few tasting notes. Add variety, elevation, producer or roast details when they help readers identify the coffee and you have a reliable value. A roaster’s lot sheet or release information is a better starting point than guessing missing facts from the origin.
Use your own tasting notes or clearly attribute notes supplied by the roaster. Descriptors such as peach and black tea describe a tasting impression; they do not, by themselves, claim those ingredients were added to the coffee.
| Field group | Include | Keep separate |
|---|---|---|
| Identity | Coffee name; brand if needed | A long brand story |
| Coffee facts | Origin, process, variety; confirmed elevation or producer | Guessed provenance |
| Tasting notes | A short set of recognizable descriptors | A full tasting paragraph |
| Optional ratings | Your impressions of roast intensity, acidity, sweetness and body | A professional quality score |
| Brew recipe | A separate companion guide when needed | Dose, water temperature and every pour on an already crowded flavor card |
Flavor words and sensory ratings answer different questions. “Peach” names a perceived character; an acidity rating describes your impression on a chosen scale. The World Coffee Research Sensory Lexicon defines 110 flavor, aroma and texture attributes and provides intensity references. Beanloom’s four editable 1–5 ratings are a simpler personal display, not that research protocol or an SCA cupping score.
Keep the coffee card layout minimal
Organize the card around three reading stops: coffee name, identifying facts, then flavor notes. Fine rules can separate those groups without adding more decoration. Leave enough space around the tasting notes for someone to find them before reading the small metadata.
Start with three short flavor notes. This is an editing choice, not a tasting standard. If the coffee needs a fourth descriptor, check the preview rather than reducing every line to tiny text. Keep one consistent treatment for the notes: plain words, chips or a short list.
Use a restrained palette with readable text contrast. A pale background, dark text and one muted accent can work for a lab-style card; Swiss Grid also supports a dark treatment. Choose an available type pairing and check the longest name and variety. These are preset layouts, so colors and text can change while the underlying arrangement stays fixed.
Make the card in an editable template
1. Prepare one set of coffee details
Keep the source information beside the editor. To reproduce these examples, use the demonstration values below. They are made-up editorial inputs, including the producer, lot and roast date. Replace them with confirmed values for your own coffee.
- Brand and coffee
- BEANLOOM SAMPLE ROASTERY; Guji Natural
- Country and region
- Ethiopia; Guji
- Variety and process
- Ethiopian Heirloom; Natural
- Elevation and roast
- 1,900 m; Light
- Producer and lot
- Sample Farm; DEMO-01
- Roast date and weight
- 2026-10-16; 250 g
- Flavor notes
- Peach; Grape; Black Tea
- Optional 1–5 ratings
- Roast 2; Acidity 4; Sweetness 4; Body 3
- Short tagline
- Illustrative tasting profile
2. Fill the coffee facts and flavor rows
In your chosen template, replace the placeholder coffee and brand names, then enter the supported origin and roast fields. Leave unknown optional values empty. Under Flavor notes, enter each descriptor in its own Display name row. Check Closest flavor match if you want to retain a dictionary association; it does not evaluate the coffee or assign a sensory score.
Use Add flavor to add a row. The editor accepts up to eight, but fitting eight notes is a different task from making a compact three-note card. If you are still choosing words, the interactive coffee flavor wheel helps you browse descriptors. It does not detect flavors from the beans.
3. Add sensory ratings only if useful
Select Add sensory profile to reveal the four 1–5 controls. The editor offers example starting values; change them to reflect your tasting or remove the profile. For the artwork here, set Roast to 2, Acidity to 4, Sweetness to 4 and Body to 3. These values are illustrative. They were not calculated from the words Peach, Grape and Black Tea.
The text field “Light” and the numerical roast rating are separate inputs. Check both rather than expecting one to update the other. If you compare several coffees, use the same interpretation of the scale across them and keep longer tasting explanations outside the card.
4. Set the appearance and review the preview
Under Color and type, adjust background, text and accent colors or choose an available type style. These examples keep each layout’s default appearance. Review the whole card after entering the longest values: a complete word at full size may wrap or become hard to read when the image is reduced.
The free template editor updates the preview directly and uses no Credits. It is a separate workflow from the generated designs in Create. You do not need to run an AI generation to make these three cards.
Compare three finished minimalist coffee cards
Each example below is a clean 1800 × 2400 PNG produced by the same renderer used for the template downloads. The data is identical; the arrangement changes. These are editorial exports, not photographs of printed cards.
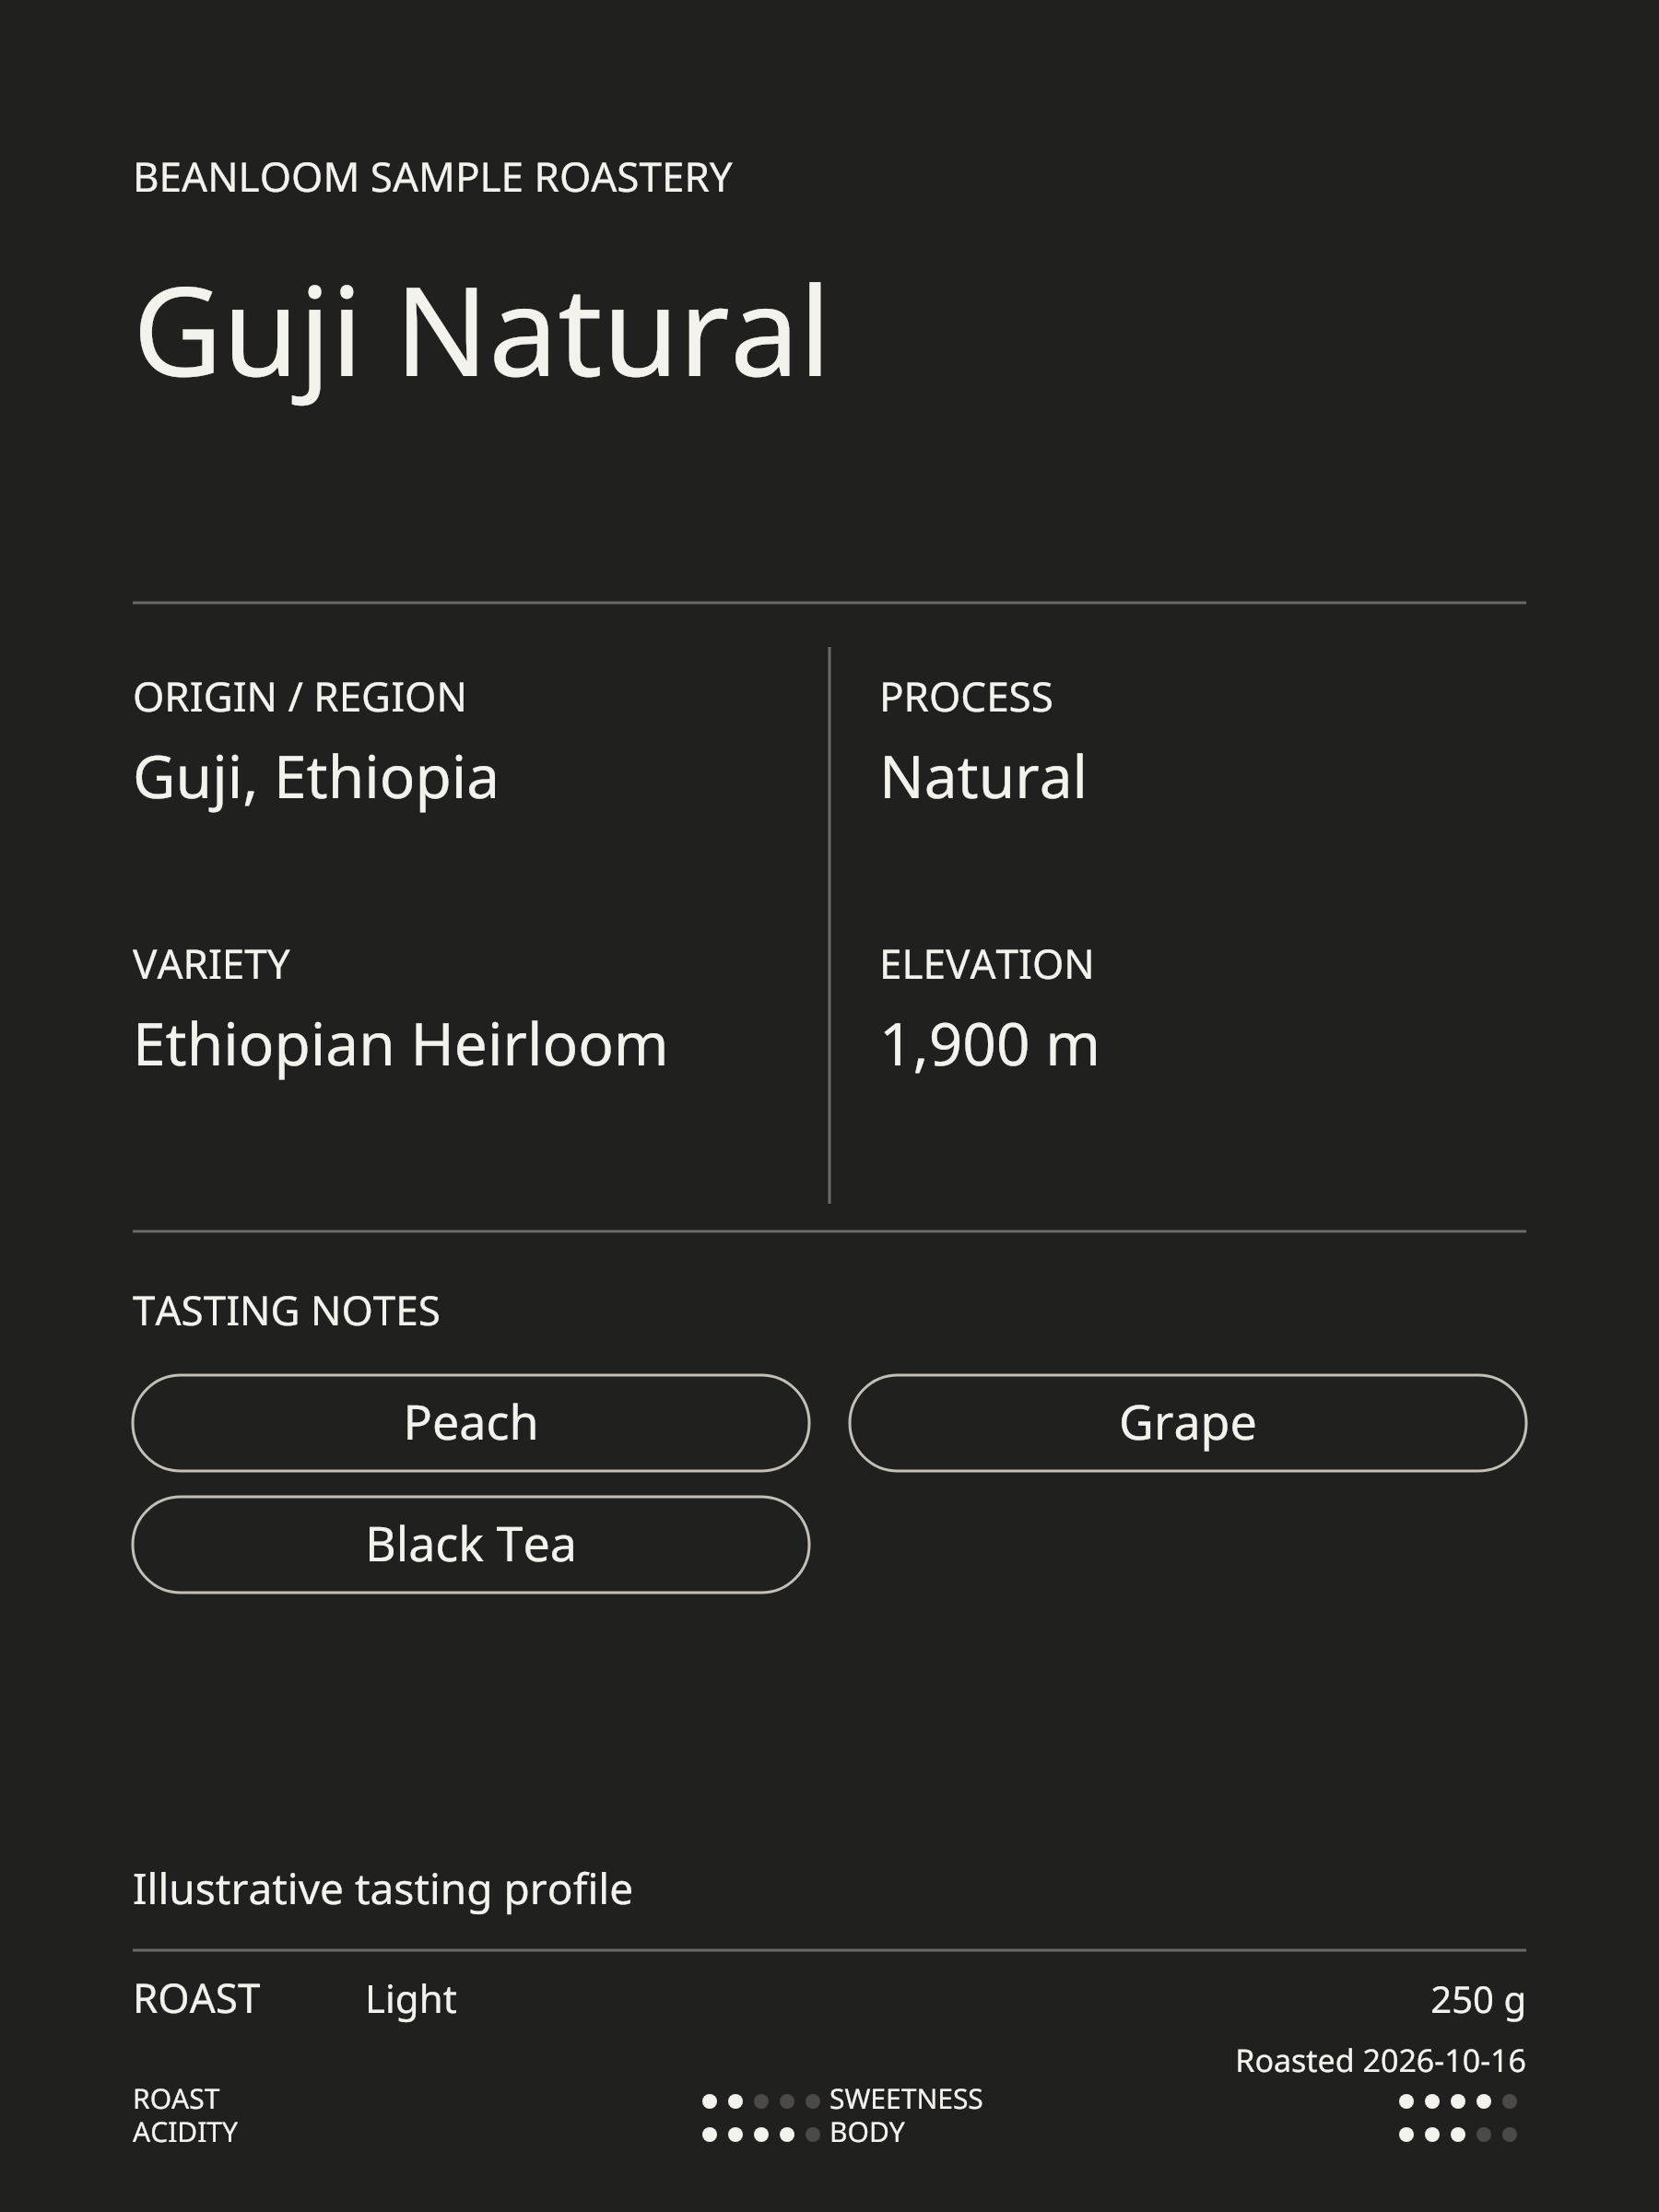
Swiss Grid: separate facts from tasting notes
Swiss Grid places origin, process, variety and elevation in defined cells, with larger flavor chips below. It gives the coffee facts clear boundaries. Its sensory rows are compact, so check their readability at the size you plan to display.
Nordic Lab: use small facts and open space
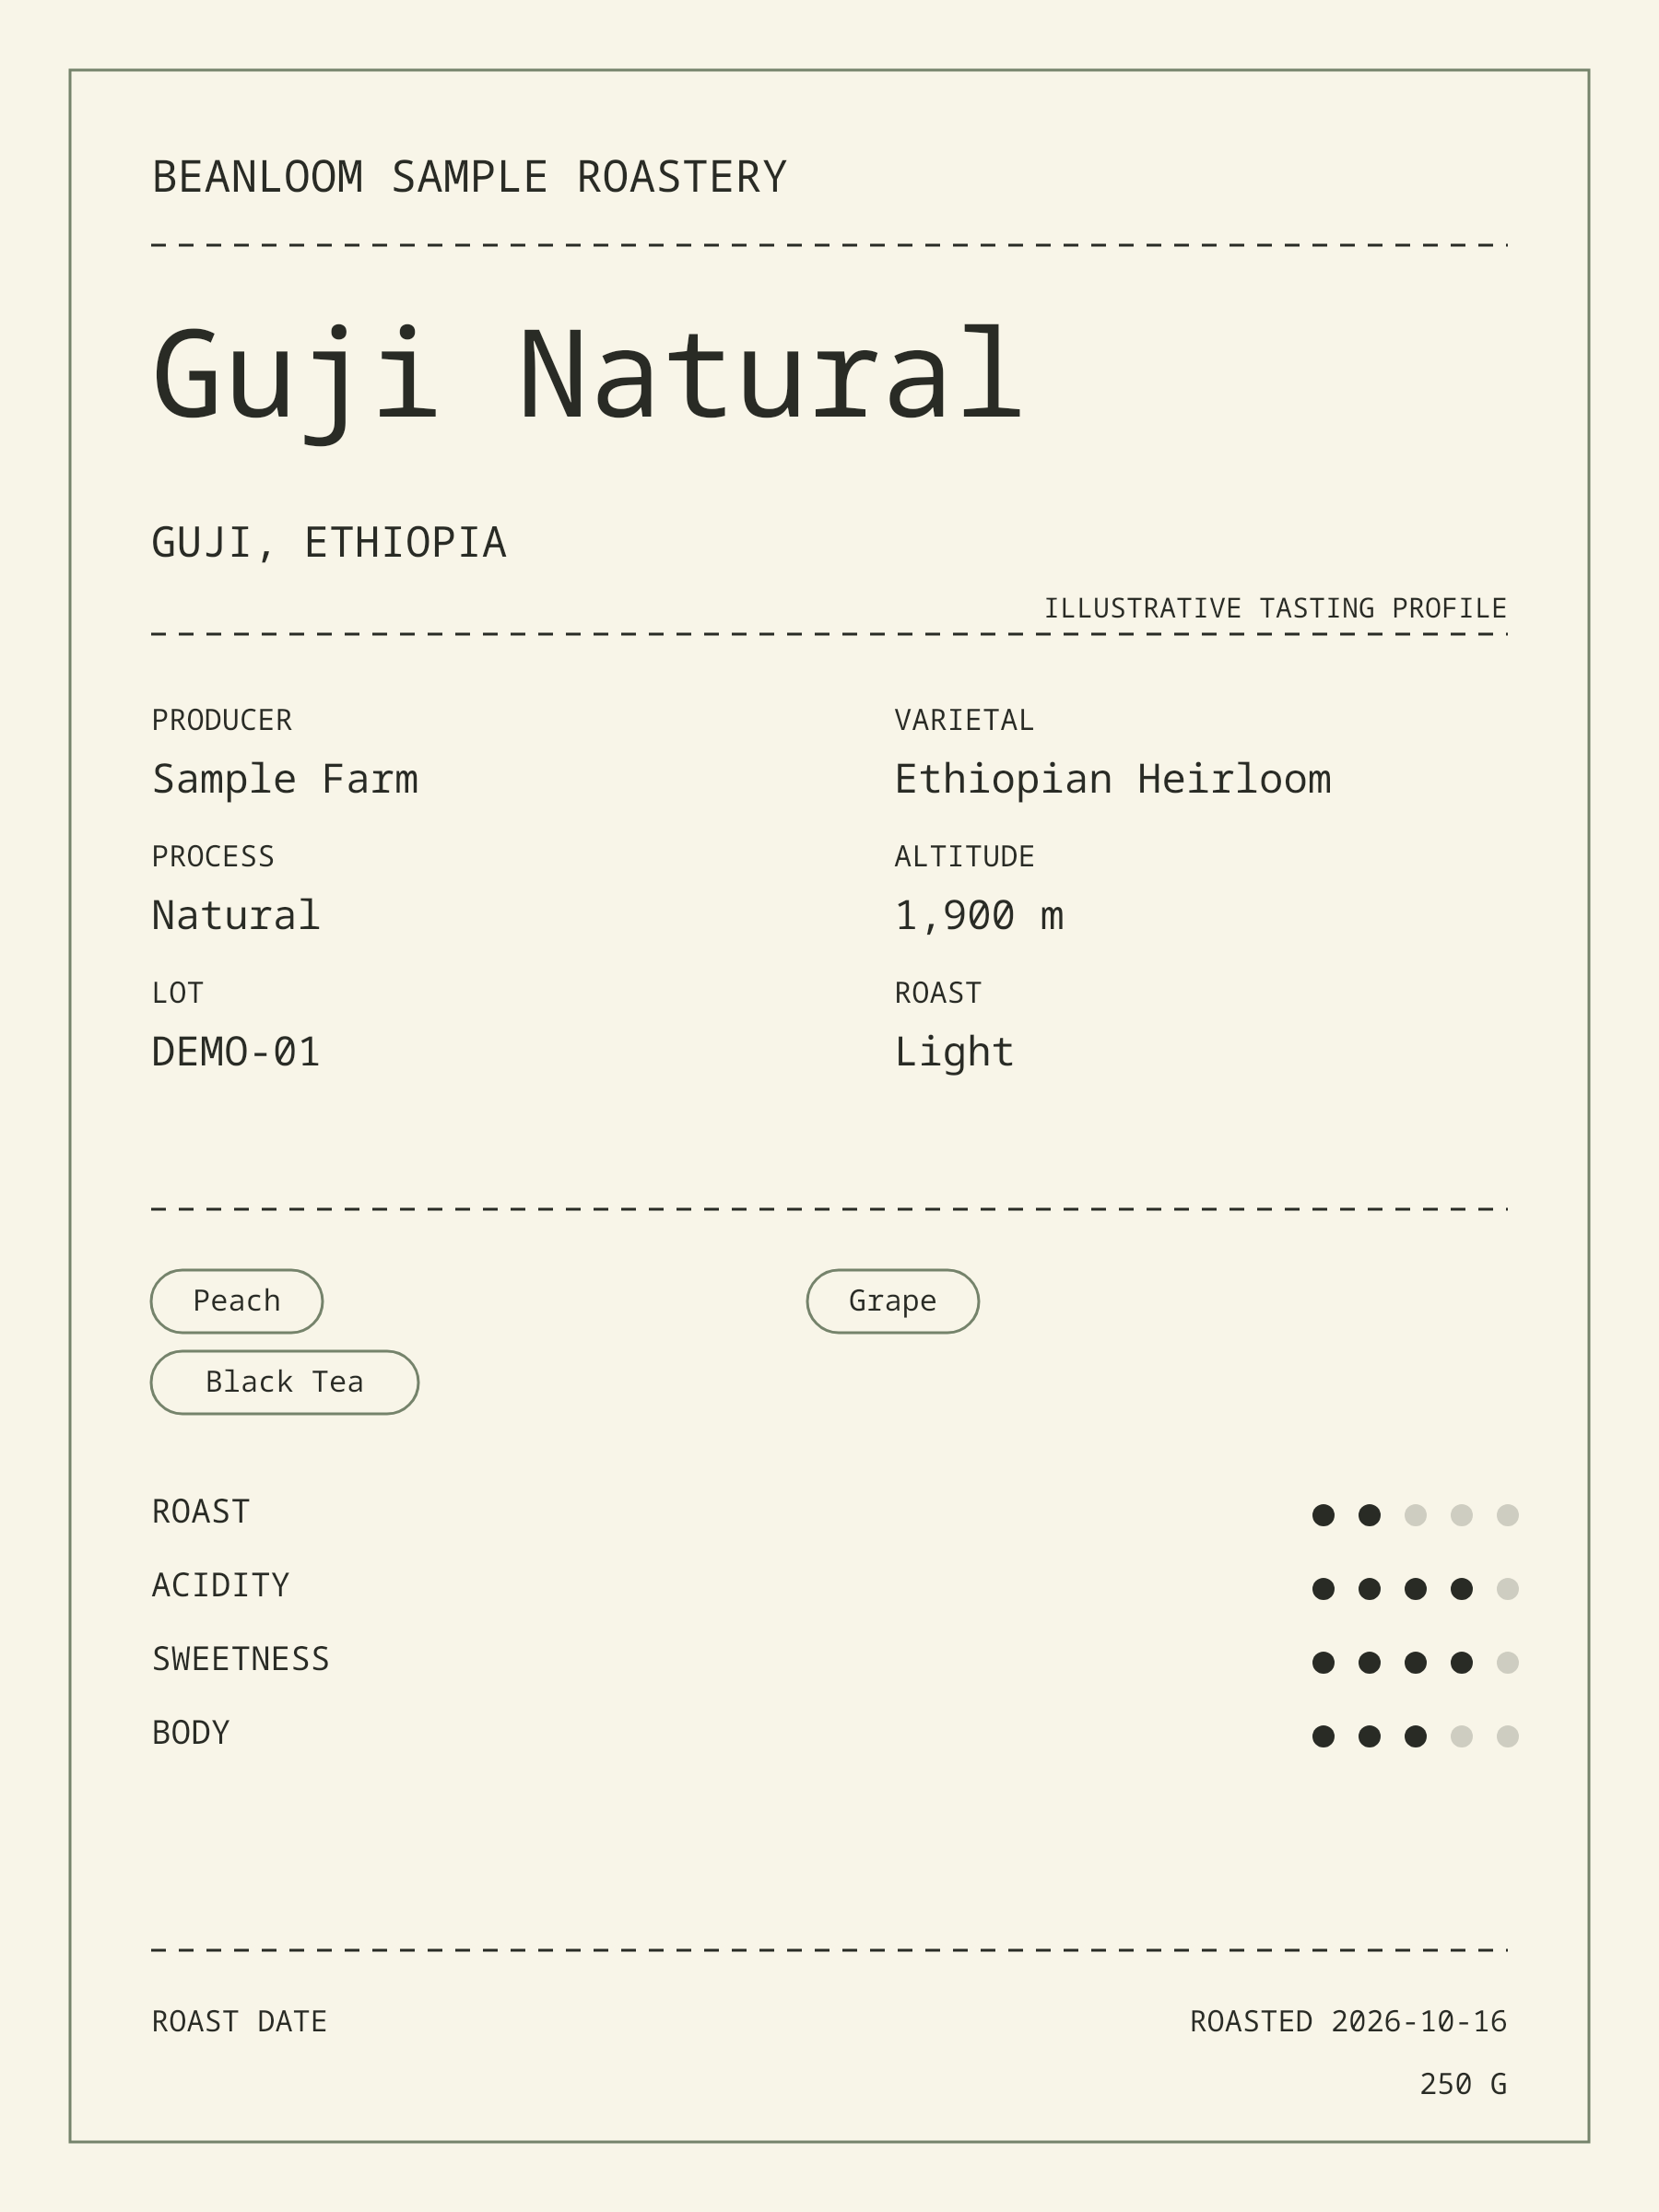
Nordic Lab uses monospaced details, fine rules and small flavor chips. The sensory rows have their own area. It suits a quieter information hierarchy, with the coffee name carrying most of the visual weight.
Kissaten Ticket: group the details like a reference ticket
Kissaten Ticket uses tabular facts, dashed rules and a narrow colored edge. The flavor words sit near the top, followed by provenance and sensory information. Check the small metadata when using this image in a narrow mobile column.
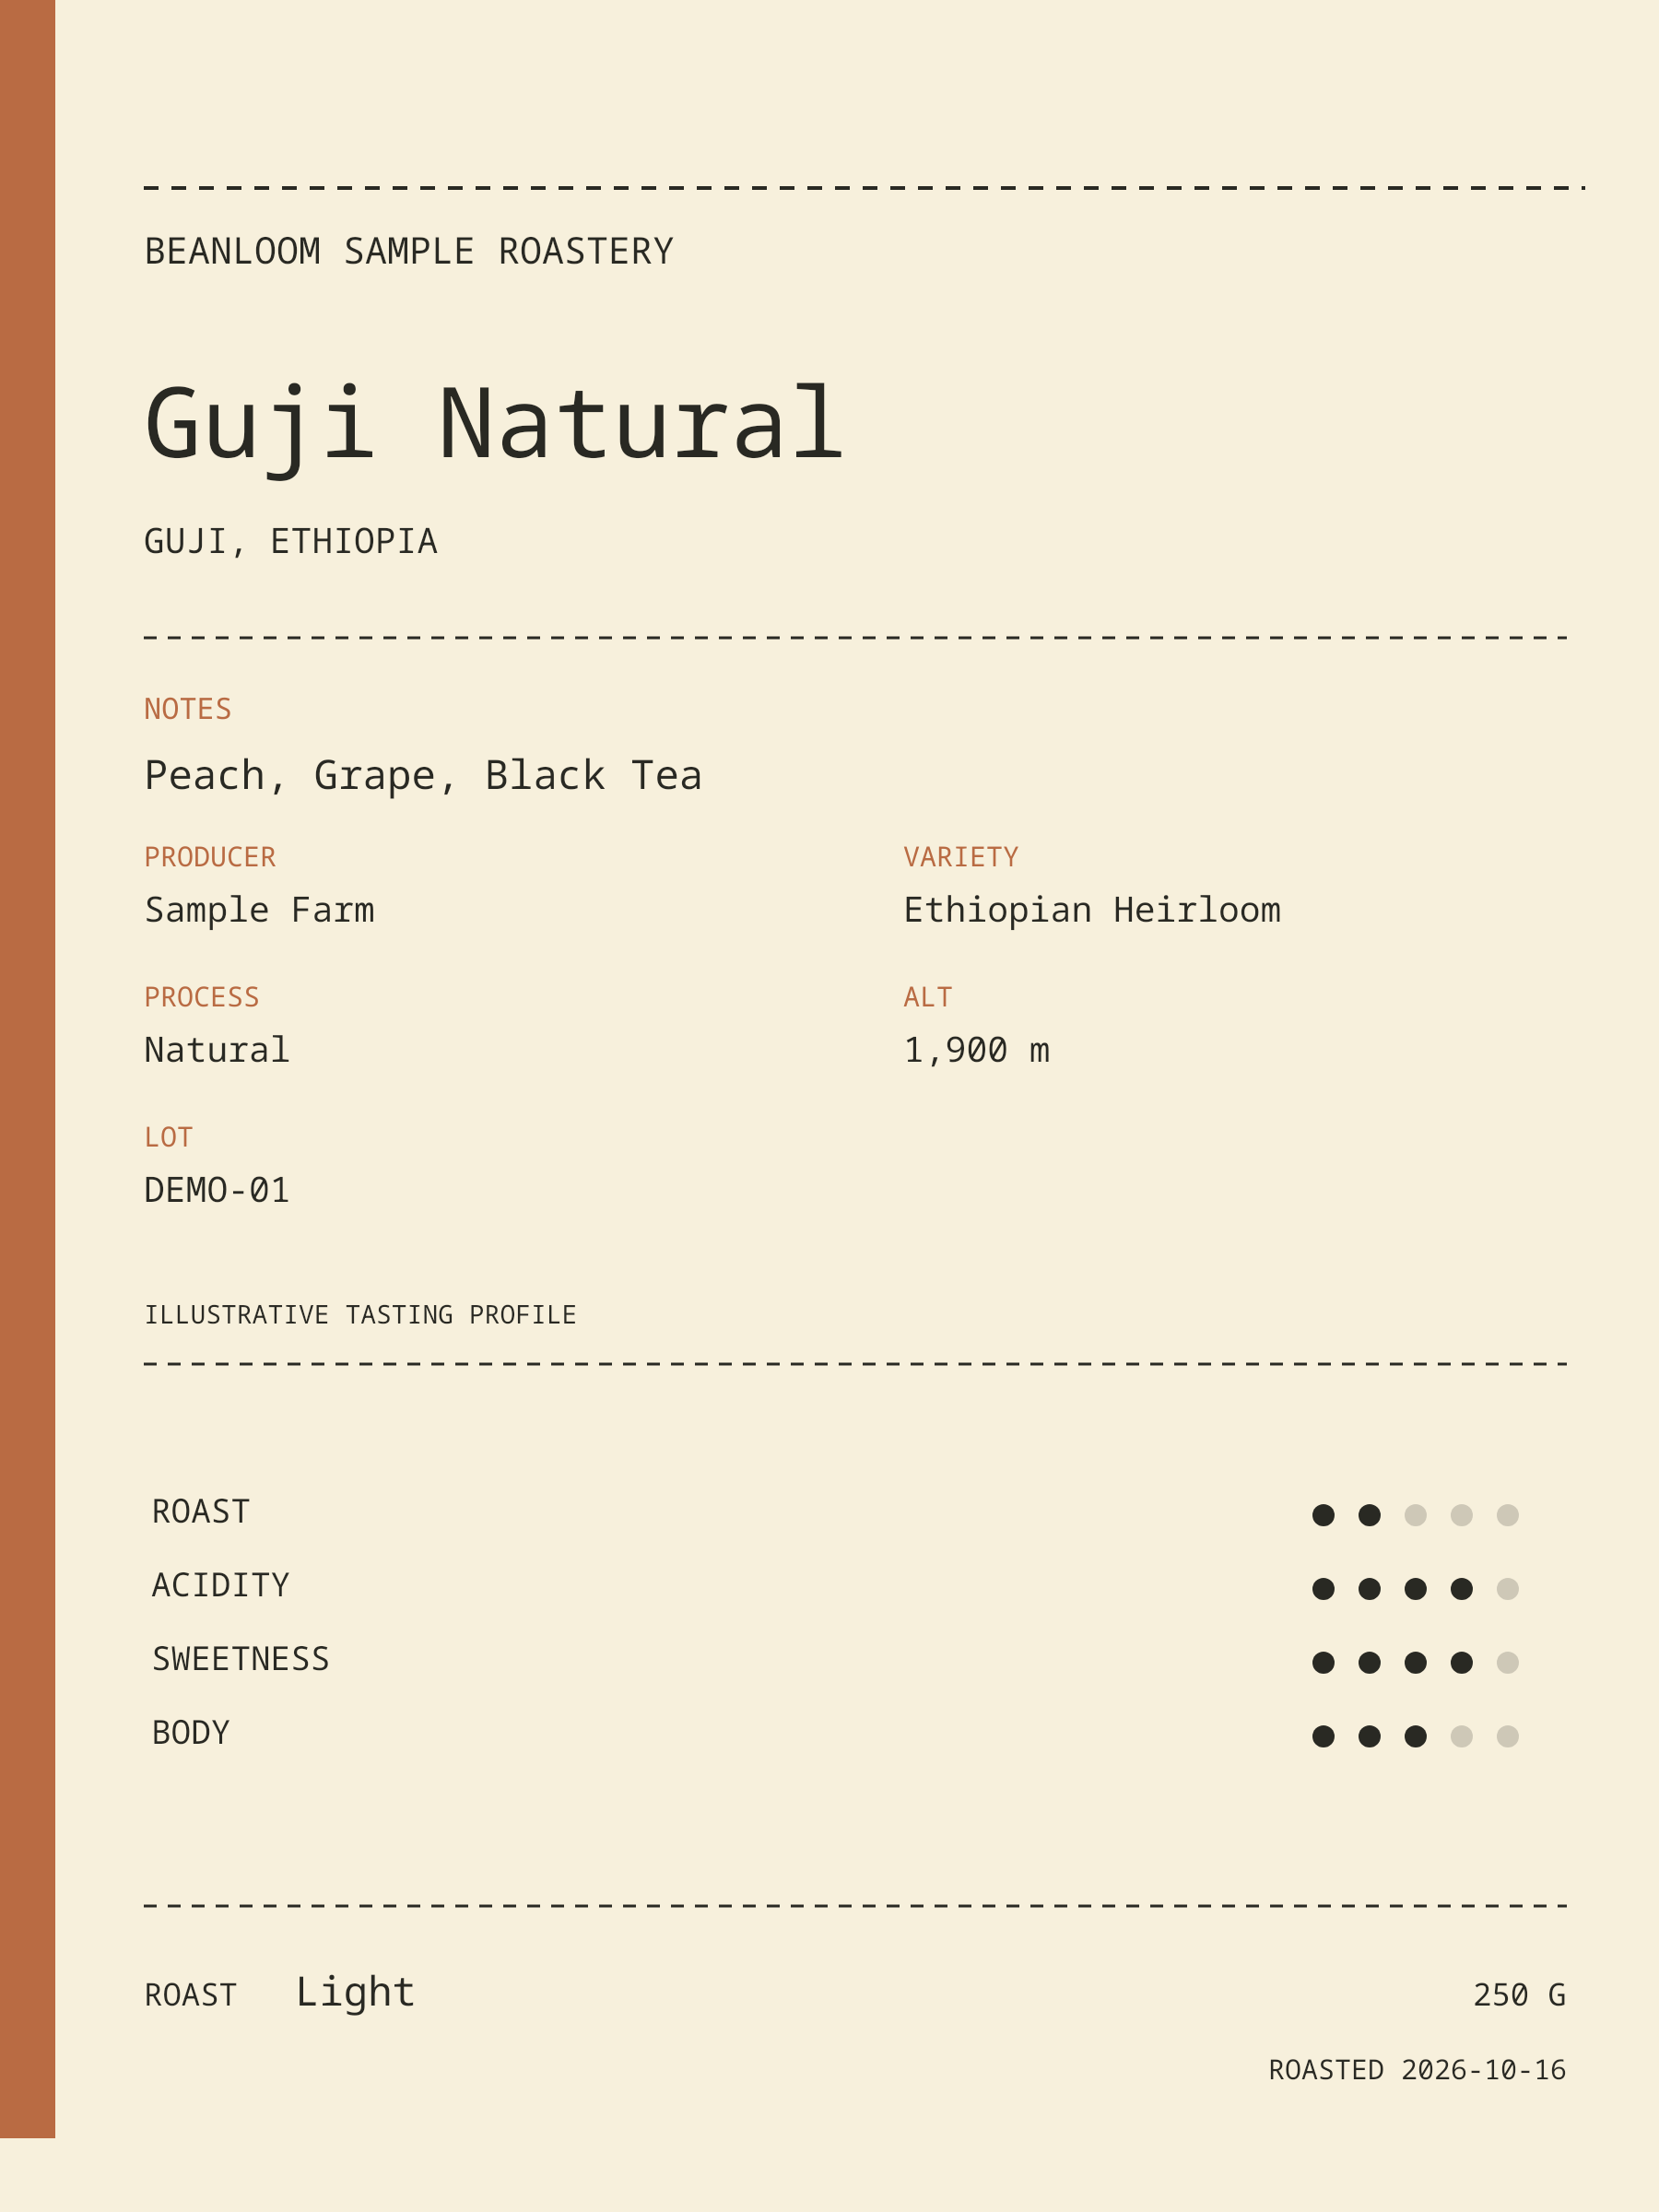
Edit the Kissaten Ticket template.
Check the coffee card PNG before sharing
Select Download PNG in the template editor and open the file. Guest downloads are watermarked 900 × 1200 PNGs. Sign in for clean 1800 × 2400 PNGs and Workspace saving. Both keep a 3:4 portrait canvas; template editing and downloading use no Credits.
- Compare the coffee name, origin, process and variety against your source.
- Read every flavor note and check the four ratings if you included them.
- View the file at its intended display size, especially the smallest labels.
- Check the destination’s crop so it does not remove notes or a footer.
For physical printing, first ask your printer for the required dimensions, resolution, bleed, color handling and file format. Beanloom exports digital artwork without PDF, bleed setup or print-ready certification. Changing an image’s DPI metadata alone does not add pixels or bleed.
Coffee flavor card questions
Is a flavor profile card the same as a tasting score sheet?
A profile card summarizes coffee identity and selected tasting impressions. A score sheet provides spaces to evaluate a tasting session, often with more criteria and notes. Choose a worksheet when you need to record observations across cups; choose a finished card when you want to communicate a concise profile.
Can this also be a brew guide card?
A brew guide needs a method, coffee dose, water or beverage amount, temperature and steps. These three templates focus on coffee facts and flavors and do not offer a full pour-by-pour recipe layout. Keep the recipe in a companion guide rather than replacing the flavor notes with compressed instructions.
Are the flavor notes and ratings objective measurements?
The notes and four ratings here are entered by the user. They communicate a tasting perspective and are not automatically measured, independently verified or converted into a quality score. Label demonstration values clearly and revise them when they do not reflect your coffee.
Start with one coffee, a short set of notes and only the facts you can confirm. Then choose a layout from the free coffee label templates and check the finished card at its intended size.